My tasks have mainly included:
- A complete, fully-rigged character head.
- The interactive navigation for the CD-ROM.
As a group we created a Gantt chart to show the planned processes of the group within the allotted time before the deadline. Here is a screenshot showing the breakdown of each task, and the suggested completion time:


Currently, we are on target with this project, as we regularly check this chart to ensure we are completing the necessary targets in time.
Product Pitch
As part of this assignment, the proposed product was pitched in an attempt to persuade investors into the product. This went very well in our opinion, which has left both ourselves, and our investors eager to see the finished product.
Head Modelling
I have used the software, Z-Brush, to model my head ready for animation. Below is a sequence of images showing how I got from my initial base mesh, to my roughly completed finished head. I use the word 'roughly', as I will receive feedback on this model, and incorporate the opinions of others to hopefully develop this into an improved product. The first images show the initial sketches drawn by Joshua, which I used as reference for creating my head model:

 Here is the sequence of stages showing my model through each sub-division level within Z-Brush. When creating the head, I tried to make it look cartoon-style, as specified in the brief, but also with good detail and proportions so that children could relate the characters features with their own.


After a group meeting, we decided that the eyes on this character were not what we were looking for as a presenter for young children. As the character was designed to be more of a cartoon-style figure, I have smoothed over the eyes in Z-brush, so that I can create independent eyes with rotating eye-lids within 3DS Max. I have appended spheres as a reference while I re-topologize the head.


Here are two images showing the eyes with and without eyelids. I modelled the lower eyelids to add more detail to the ambient occlusion when the textures are baked onto the models.


Head Re-topology
After completing the modelling for the character's head, I brought the .OBJ file into 3DS Max to create a lower resolution of polygons for easier access to animation, and a smaller file size.

After the topology was finished, I used a symmetry modifier and welded both sides together.


I tested the bump map to see which levels would give me the best texturing. I have a screenshot showing the bump map at: 30, 100 and 150. I personally prefer the bump level at 100.


Here is a render showing both characters with their assigned textures:

Assigning Morph Targets
I have found a very useful tutorial explaining how to properly create a facial rig in 3DS Max, by assigning morph targets and using sliders and constraints to make animating the face much easier than keyframing each vector or polygon.
The tutorial can be found here: http://athey.comyr.com/tutdump/facerig/index.html
Work in Progress Presentation
We have a group presentation where we will show our clients the current status of the product and its functionality. The presentation will be in a formal and professional manor, to hopefully satisfy our investors.
To show our current progress, I have uploaded a screenshot showing the Gantt Chart for our project:

CD-ROM Interactive Navigation
For the navigation, I am using Adobe Flash CS5. Before this project I had some prior experience using Macromedia Flash MX, which is now a rather primitive version of the software. The main change within the software for me, is the incorporation of Actionscript 3.0, which is a lot more complicated to use than Actionscript 1.0 or 2.0. I have looked at tutorials and found as much information as I can to aid me in creating a professional looking, fully functional CD-ROM. The aim is to produce a '.swf' file which can be burnt to a CD-ROM, so that it can be used on other computers. Depending on legality, we would also include a copy of the Flash Player Installer from the Flash website, so that anyone would could install, and run our software.
Below is example screenshots showing the layout of my first navigation design. As I am not designing the colours, images, backgrounds etc, I have just created this prototype to test links and buttons:


After a feedback session with Darren Wall, we have decided that the colour scheme may not be ideal for our target audience. Also, the fact I have used 2 different fonts looks unprofessional. These are useful changes which can be made for the next prototype.
Saving to a Disc for Windows and Macintosh Users
I was wondering about how to burn the finished product to a disc that can be used by both Windows and Mac users. I have looked at several different websites with scripts to 'Autorun' the software - but want to attempt this as a practice prototype first.
This website looks useful:
http://www.ehow.com/how_5883109_save-flash-files-disk.html
This website has the autorun feature and looks very simple to do:
http://www.amarasoftware.com/tutorials/auto-launch.html
CD-ROM Navigation: Version 2
After speaking with the clients for our product, it was decided that their were a few factors which should be changed to create a more professional and functional product.
The colour scheme originally chosen did not provide the style we were hoping for our target audience. The colours seem a bit too bold and overpowering, so we have decided to use less colours with varying shades. This should make the product look much more aesthetically pleasing, and pay greater focus to the main aspect of the product - the informative videos. Another point was the use of different fonts in the prototype, which made it look rather messy. The use of one style of font throughout is definitely better in keeping with the selected theme.
These images show some of the navigation pages with the working links and an embedded video showing the product is functional and just requires the finished videos and images.


The navigation has been divided into 'Learn' and 'Test'. Learn has the educational videos under each category and has the character wearing a graduation hat. Test gives the user 3 possible answers and a video is shown. The user must successfully identify the correct answer.
Product Pitch
As part of this assignment, the proposed product was pitched in an attempt to persuade investors into the product. This went very well in our opinion, which has left both ourselves, and our investors eager to see the finished product.
Head Modelling
I have used the software, Z-Brush, to model my head ready for animation. Below is a sequence of images showing how I got from my initial base mesh, to my roughly completed finished head. I use the word 'roughly', as I will receive feedback on this model, and incorporate the opinions of others to hopefully develop this into an improved product. The first images show the initial sketches drawn by Joshua, which I used as reference for creating my head model:


After a group meeting, we decided that the eyes on this character were not what we were looking for as a presenter for young children. As the character was designed to be more of a cartoon-style figure, I have smoothed over the eyes in Z-brush, so that I can create independent eyes with rotating eye-lids within 3DS Max. I have appended spheres as a reference while I re-topologize the head.


Here are two images showing the eyes with and without eyelids. I modelled the lower eyelids to add more detail to the ambient occlusion when the textures are baked onto the models.


Head Re-topology
After completing the modelling for the character's head, I brought the .OBJ file into 3DS Max to create a lower resolution of polygons for easier access to animation, and a smaller file size.
After the topology was finished, I used a symmetry modifier and welded both sides together.


UVW Unwrapping
I then used a cylinder UVW unwrap to layout the mapping of the new topology, enabling me to texture the head.


These images show the UV co-ordinates before and after smoothing:


Texturing
Once I managed to get a good UV map, which had been relaxed to give a square checkerboard effect, I imported this into Photoshop to create a Diffuse, Normals and Ambient Occlusion to include in my materials for the modelled character head. In order: Diffuse, Ambient Occlusion, Normals, Merged.


I then coloured over the diffuse to create the texture for our second selectable character:

These images show my testing for the diffuse map. I noticed that there were white rings around the insides of the eyes on this model, so I shifted it to black to see if this made a difference. When I saw that it did, I tried using the same RGB value which is used for the map within Photoshop, this did not work however as it did not have the ambient occlusion or normals map in this area.

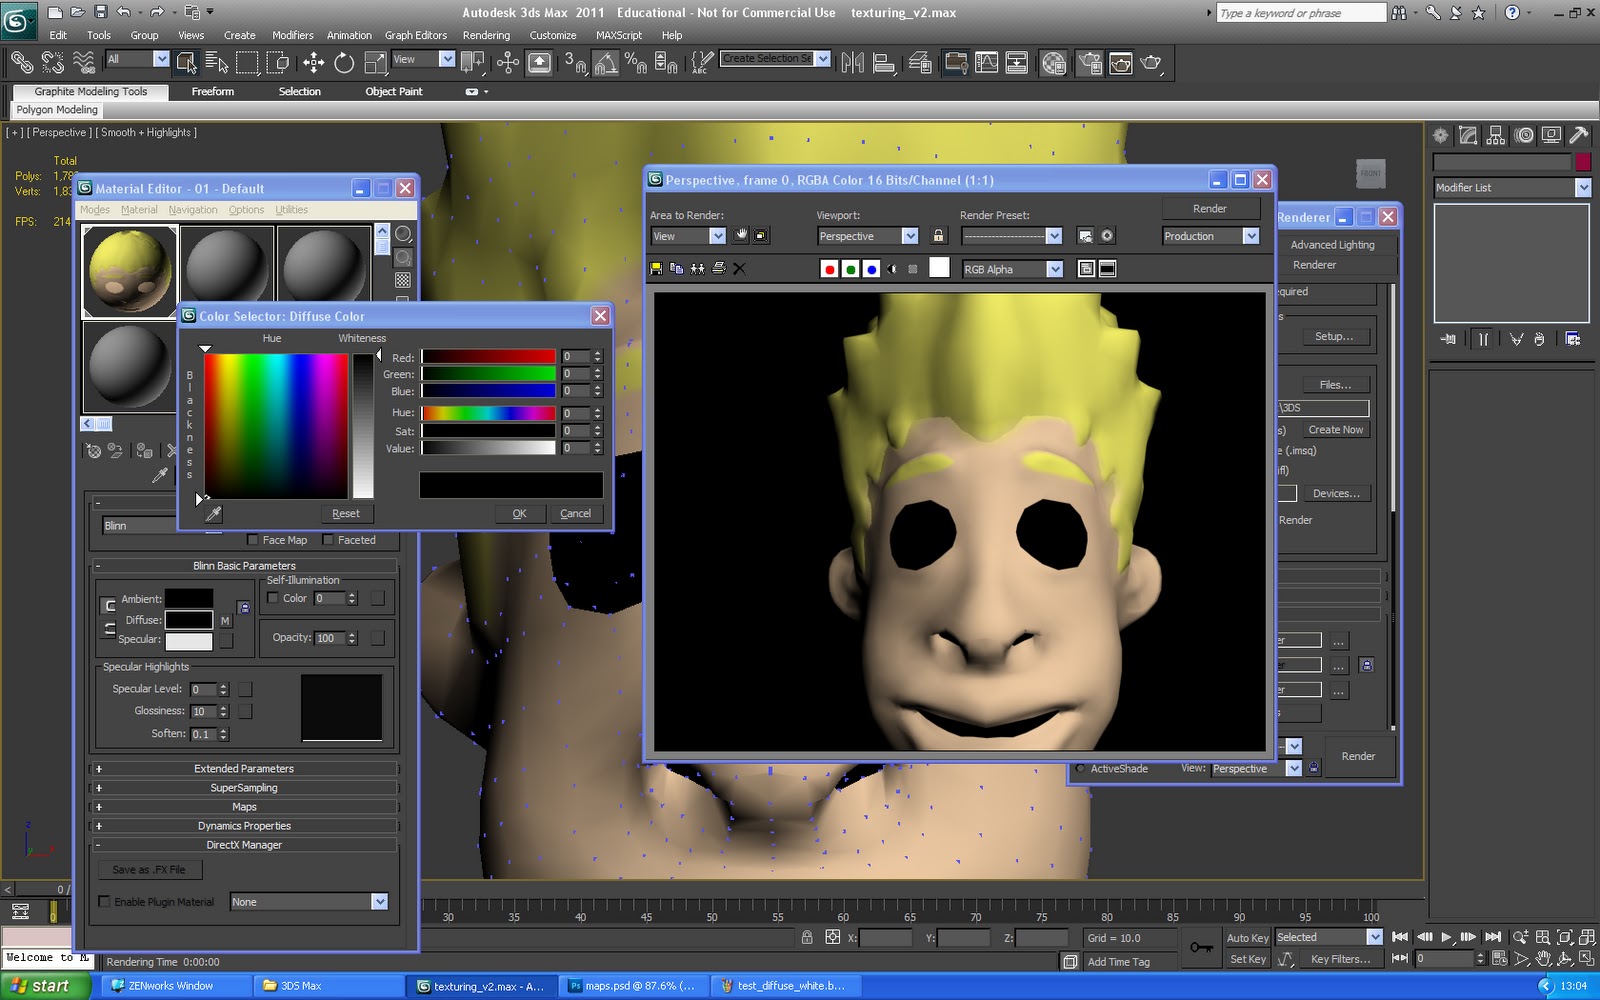
I tested the bump map to see which levels would give me the best texturing. I have a screenshot showing the bump map at: 30, 100 and 150. I personally prefer the bump level at 100.


Here is a render showing both characters with their assigned textures:

Assigning Morph Targets
I have found a very useful tutorial explaining how to properly create a facial rig in 3DS Max, by assigning morph targets and using sliders and constraints to make animating the face much easier than keyframing each vector or polygon.
The tutorial can be found here: http://athey.comyr.com/tutdump/facerig/index.html
Work in Progress Presentation
We have a group presentation where we will show our clients the current status of the product and its functionality. The presentation will be in a formal and professional manor, to hopefully satisfy our investors.
To show our current progress, I have uploaded a screenshot showing the Gantt Chart for our project:

CD-ROM Interactive Navigation
For the navigation, I am using Adobe Flash CS5. Before this project I had some prior experience using Macromedia Flash MX, which is now a rather primitive version of the software. The main change within the software for me, is the incorporation of Actionscript 3.0, which is a lot more complicated to use than Actionscript 1.0 or 2.0. I have looked at tutorials and found as much information as I can to aid me in creating a professional looking, fully functional CD-ROM. The aim is to produce a '.swf' file which can be burnt to a CD-ROM, so that it can be used on other computers. Depending on legality, we would also include a copy of the Flash Player Installer from the Flash website, so that anyone would could install, and run our software.
Below is example screenshots showing the layout of my first navigation design. As I am not designing the colours, images, backgrounds etc, I have just created this prototype to test links and buttons:


After a feedback session with Darren Wall, we have decided that the colour scheme may not be ideal for our target audience. Also, the fact I have used 2 different fonts looks unprofessional. These are useful changes which can be made for the next prototype.
Saving to a Disc for Windows and Macintosh Users
I was wondering about how to burn the finished product to a disc that can be used by both Windows and Mac users. I have looked at several different websites with scripts to 'Autorun' the software - but want to attempt this as a practice prototype first.
This website looks useful:
http://www.ehow.com/how_5883109_save-flash-files-disk.html
This website has the autorun feature and looks very simple to do:
http://www.amarasoftware.com/tutorials/auto-launch.html
CD-ROM Navigation: Version 2
After speaking with the clients for our product, it was decided that their were a few factors which should be changed to create a more professional and functional product.
The colour scheme originally chosen did not provide the style we were hoping for our target audience. The colours seem a bit too bold and overpowering, so we have decided to use less colours with varying shades. This should make the product look much more aesthetically pleasing, and pay greater focus to the main aspect of the product - the informative videos. Another point was the use of different fonts in the prototype, which made it look rather messy. The use of one style of font throughout is definitely better in keeping with the selected theme.
These images show some of the navigation pages with the working links and an embedded video showing the product is functional and just requires the finished videos and images.


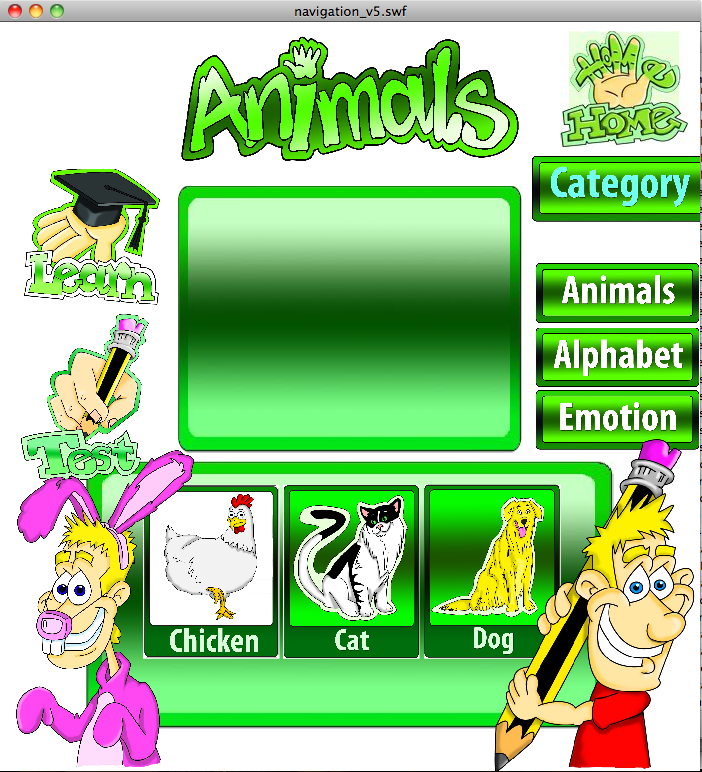
The navigation has been divided into 'Learn' and 'Test'. Learn has the educational videos under each category and has the character wearing a graduation hat. Test gives the user 3 possible answers and a video is shown. The user must successfully identify the correct answer.
Importing / Embedding Video within Flash
I was originally unsure about how to import or embed a video into flash, which was crucial for creating the interactive flash document successfully. I discovered online that the best way to do this was to either have the video within the document timeline which would play in time with the .swf file. I have used actionscripting for the navigation which causes the timeline to stop at each frame. For this reason, I have converted the .mov file used to a .f4v file using Adobe Media Encoder, which can then be dropped onto the flash document which sufficient playback.
The link I used can be found here: http://video.about.com/animation/Import-Video-Into-Flash.htm
Product Evaluation
In its current state, the product is showing areas of completion and the areas that are not quite finished can be easily updated once the material has been rendered out.
The main task still left to complete is the animating of the head and body for each word/letter we have on the CD-ROM. As the body is fully rigged and skinned, and the head has been morphed and constrained, the animation can be done easily, leaving us more time to spend on human realistic motion. We feel that this is an important area to research thoroughly as accuracy will only make the product more educational and useful for our target audience. Any additional material can be used in conjunction with the video footage captured in our initial research and planning module.
Group Evaluation
From looking at the Gantt chart showing our group progress on this current project, you can see that we are on track with our project and are confident that we will have a professional product as requested by our clients.
As a group we have maintained constant, productive communication to make sure that both members of the group are keeping up-to-date with their tasks. Below are screen shots showing messages sent on Facebook between the group. This function was very helpful for sending files to each other.