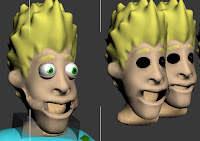
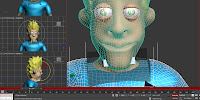
For creating the morph targets I initially did not realise that the morph target results would be very different whether the head was an edit poly or edit mesh. The initial head I used was an edit mesh which meant many of the head's facial features became distorted with morphing. Once the head was converted to an editable poly instead, these distortions were not as obvious or harsh.
As you can see from the image, the distortions are major with the aesthetics of the model being reduced heavily. Once I converted the head to an edit poly however, these disfigurements went away.
A problem I faced when duplicating the head, was that due to the skin modifier being copied as well, the head would move back to its original position. By copying the head and deleting the skin modifier, this allowed me to move the heads and edit them without them snapping back into position.
By using soft selection on my morph targets, this allowed me to select more vertices at different strengths to give a more even smoother look. The images below show the soft selection in action:
The image below shows my final morph targets, ready for animating:
Animating the Head
The animation for the head was done using keyframe animation. Using the autokey function, the morph targets are adjusted using the sliders, the autokey then saves this movement for playback. The images below show the rotation of an eye for a blink animation, and the mouth morphing to articulate a word:
I generally tried to keep all of the mouth animation within around a 30 frame timescale to make the movement look realistic, and help to synchronise with the audio clips.
Creating the Background
For the background to the character, we decided to have basic shapes like in a children's room. We decided on 3 possible designs: clouds, bubbles and leaves. Josh drew these in his sketchbook and scanned them into the computer, then I drew round the shapes in Illustrator, shaded the images in Photoshop and applied these as the background within 3DS Max.
I initially struggled with how to import the videos into Flash, as I was not sure which actionscript, command or method to use. I decided to research the 'loadmovie' and 'loadURL' options which appeared more complicated than I thought necessary. As we were exporting the product onto a CD-ROM, the videos would have to be either embedded into the timeline, or linked somehow to the path from the document. In the end, I decided that embedding would cause too big a file size for our computers to be capable of running smoothly.
I had previously tested a .f4v video to see how this worked with the .swf file. As this worked fine I decided to use Adobe Media Encoder to convert the .mov renders from 3DS Max. The images below show this process of encoding a video ready for importing.
The video is the imported into the document, resized to fit within the designated area, and then it is ready to be viewed when exported.
Converting JPEG's to PNG's
Our product uses PNG images with a transparent background so that the images blend nicely with the other layers. There are no harsh corners or white areas making the scene look cluttered. To do this I opened the images in Photoshop and created a 'layer from background'. Using the magic wand tool I deleted the blank background areas so that the image looks good.
Due to the amount of different frames with similar data, I was able to copy and 'paste in place' certain frames and images.
Once the frames had been placed and action scripted, then any other frames placed within the timeline would change the navigation of the buttons. This meant I had to either be careful where certain frames were, or plan it out before hand. Even though I went for the pre-planned option, changes in design meant that some frames were out of order. The image below shows the 2 identical frames except for the image and video render:
Capturing the Audio
We decided to have a voice over recording of each letter and word to be taught in our product. These were recorded using a Flash Mic that we hired from university. With the raw footage recorded, I transferred the data to my computer, and using Adobe Sound booth, cut the audio into separate tracks ready to be merged with the renders. The first image below shows the original sound wave for 'chicken', with the chosen section selected. The second shows an independent clip with decibel level increased.
Merging the 3D Scenes
Once each of the 3D scenes have been named and are waiting for animating, any changes to one scene must be done to each of them to ensure the videos look the same style. Each scene required the material to be made double-sided, so that the background could not be seen through the character's nose and mouth.
3-point lighting was used to capture the shadow of the characters movement on his body. This helped to identify the depth of movement between the arms and chest.
Merging the Renders with the Audio
Using Final Cut Pro, I merged the renders of the mid range and close range shots, with the audio files created using the flash mic. The sequences are then rendered out using Quicktime conversion. With the .H264 compression, and renders done at 30fps, these clips are converted to .f4v files, ready for importing into the Flash document.
Completing the Gantt Chart
For this project, we have kept a Gantt chart to remind us of when certain tasks need completing by - so that we do not fall behind with our deadlines.
The final, fully completed Gantt chart image shows all of our tasks are 100% completed except for the 'Motion Capture', which we decided against including in the product.
Individual Evaluation
Overall, I am very happy with my contribution towards this product. I feel that I have developed and used my skills well, to aid in creating a fun and interactive product which could potentially strengthen communicational and educational abilities within young children who are hard of hearing.
The main skills I have developed are within software areas I was already familiar with, but have explored areas which previously I had not. It was my second time using Z-Brush, which I thoroughly enjoyed, but feel that my modelling abilities will improve the more I use it. I am wanting to use this program within the industry in the future. The software I had the least experience with was Adobe Flash. I have used this a little at A-level, but felt it was suitable for creating the interactive navigation. I encountered many problems with Flash, such as how to import the video files and create fully functional navigation with a smaller file size as possible, which I am proud to say resolved the issues. Other issues which I overcome were the distorted morph targets within 3DS Max. If this had not been resolved, the character would have been hideous and certainly not appeal to small children.
I feel that I used my time productively throughout this project, and did not allow myself to fall behind with any deadlines. I was able to work on the Flash document whilst travelling to and from university using my laptop. This meant that I could put my commuting time to good use.
If I was to make this product again, I would like to spend more time focusing on the character modelling side as this would be my ideal career to move into. I would create more morph targets to show more expression on the face, which would help improve the overall look of the product.
Group Evaluation
As a group, we feel that this product displays a broad range of skills, both technically and creatively. Working in this group has allowed us to experiment with various different ideas, technical processes and software. We feel that we have been a good group in the way that we have shared the workload equally. By dividing up the tasks and processes early on, both of us knew what was expected of us, and by what deadline. Occasionally, we would swap files using Facebook and Hotmail to help each other out.
We are both under the impression that constant communication is essential to working well as a group, so that ideas can be shared, and each member of the group receives regular updates about the product and its current stages. Outside of university, we are good friends, which meant that our regular Facebook chat sessions could be utilised for our project.
We are both comfortable with the idea of working with each other again on future projects, should the opportunity arise, as we both have similar tastes and styles with regards to our animation, and also our social lives.
Product Evaluation
We are very pleased with the outcome of our product, and feel that we have designed and created something which could be very beneficial to young children with disadvantages in their communication skills. The product contains a broad range of good quality images, with little repetition, keeping the user enticed throughout the product.
The test feature allows users to challenge themselves and find out how much they have learnt from the product. Although the test features only one question for each category, the functionality shows that more questions and categories could be created for a larger product.
We are happy that we got a test feature which allows users to challenge themselves and find out how much they have learnt from the product. Although the test features only one question for each category, the functionality shows that more questions and categories could be created for a larger product.
We completed everything we set out to do and feel we met our aims and objectives successfully.What would we do different:
If we were to carry on with this project there would be several changes and additions that we would make to improve the quality and fun within the product. In no particular order we would:
· Create a customize section where by you can interchange colour scheme’s within the overall layout. And also change and create viewport backgrounds. This makes the experience more personal to the user.
· Create a female signing avatar so it is more gender friendly. Perhaps with a lot more time an area could be developed were you customize your own characters similarly to a Mii character on the Wii console.
· I would rig the model better around the arms as there is some mesh distortion around the armpit regions during specific movements as mentioned within evaluation
· Add more categories for the basics of sign language. Categories would include subjects such as colours, household items, questions, numbers and time.
· Make the Test section larger by adding a “sentence build” section.
· Add extra morph targets such as smile, sad and surprised expressions
· Animate the sign language that represents the introducing paragraph.
· Spend more time sculpting the face to create more definition within the nose and ears bringing the character to life.


No comments:
Post a Comment