Wednesday 18 May 2011

Testing the Product

As a group we have divided many of the tasks between the two of us. Some tasks will be carried out together, and other tasks we will be expected to complete in our own time. To ensure the product is at its best functionality for our deadline, we have carried out a number of tests.

A little after the work in progress phase of the product creation we had sufficient renders and functionality of the product to test it on a young deaf child. I took the product to my young cousin, age 5. I wanted to stay out of the testing as much as possible so I briefed his mother on the product and let her help my cousin start. He seemed to grasp the concept of the product and was interacting with it fairly easily. General comments that arose were
 The texture of the black character didn’t look appropriate as it had a green tint
We retextured the Black character and test rendered it until it looked accurate.
  The writing was difficult to read against the background
We assessed the colour of the writing and background and added an outline around the edge of the writing so it stands out more
 The Test section was difficult to understand as it wasn’t clear what the question was or whether the answer was correct
We created a correct and wrong symbol to be enforced on the page of the appropriate frame for the answer. Also we enlarged the Question and kept it as basic as we could.
This was helpful as changes such as these are fundamental for creating an engaging product. Colour schemes and writing are important to get correct.  We received positive feedback on the animation and was told it was easy to repeat.

 
Video Source Path Testing

For the videos to be displayed within our product, a source path is used for Flash to load the video from an external source. With this in mind, I wanted to make sure that the videos could be loaded and viewed once the product had been burned to a disc.


I initially tested this with a USB pen to see that the video would load up. This did not work however as the source path was not created correctly. After changing this, the path became much shorter with the video working.

To check that multiple videos would load into the same timeline, I converted another video file to .f4v, and tested the buffering time, video size and quality when exporting the file as .swf.


This is a screenshot showing the product with a working render imported into the timeline:


Font Colouring for Final Product

The colours for the text have been difficult to decide upon due to the gradients and colouring of the navigation layout. As the text box backgrounds change colours, the choice is either to change the layout colour scheme, the text colour scheme or both. As we have spent a long time deciding on our colour scheme, it has been suggested that we trial different text colours.


 In my opinion, none of these text colours really work for the product. Each of the examples show that the text is not easy to read at a particular part of the gradient background. I would suggest that the white writing is the best of these, with the grey writing pretty much useless.

I have attempted to outline the text with another colour to see whether this makes all the text clearer, without the colour of the background impacting the text.


Monday 16 May 2011

Finishing the Product

Morph Target Creation


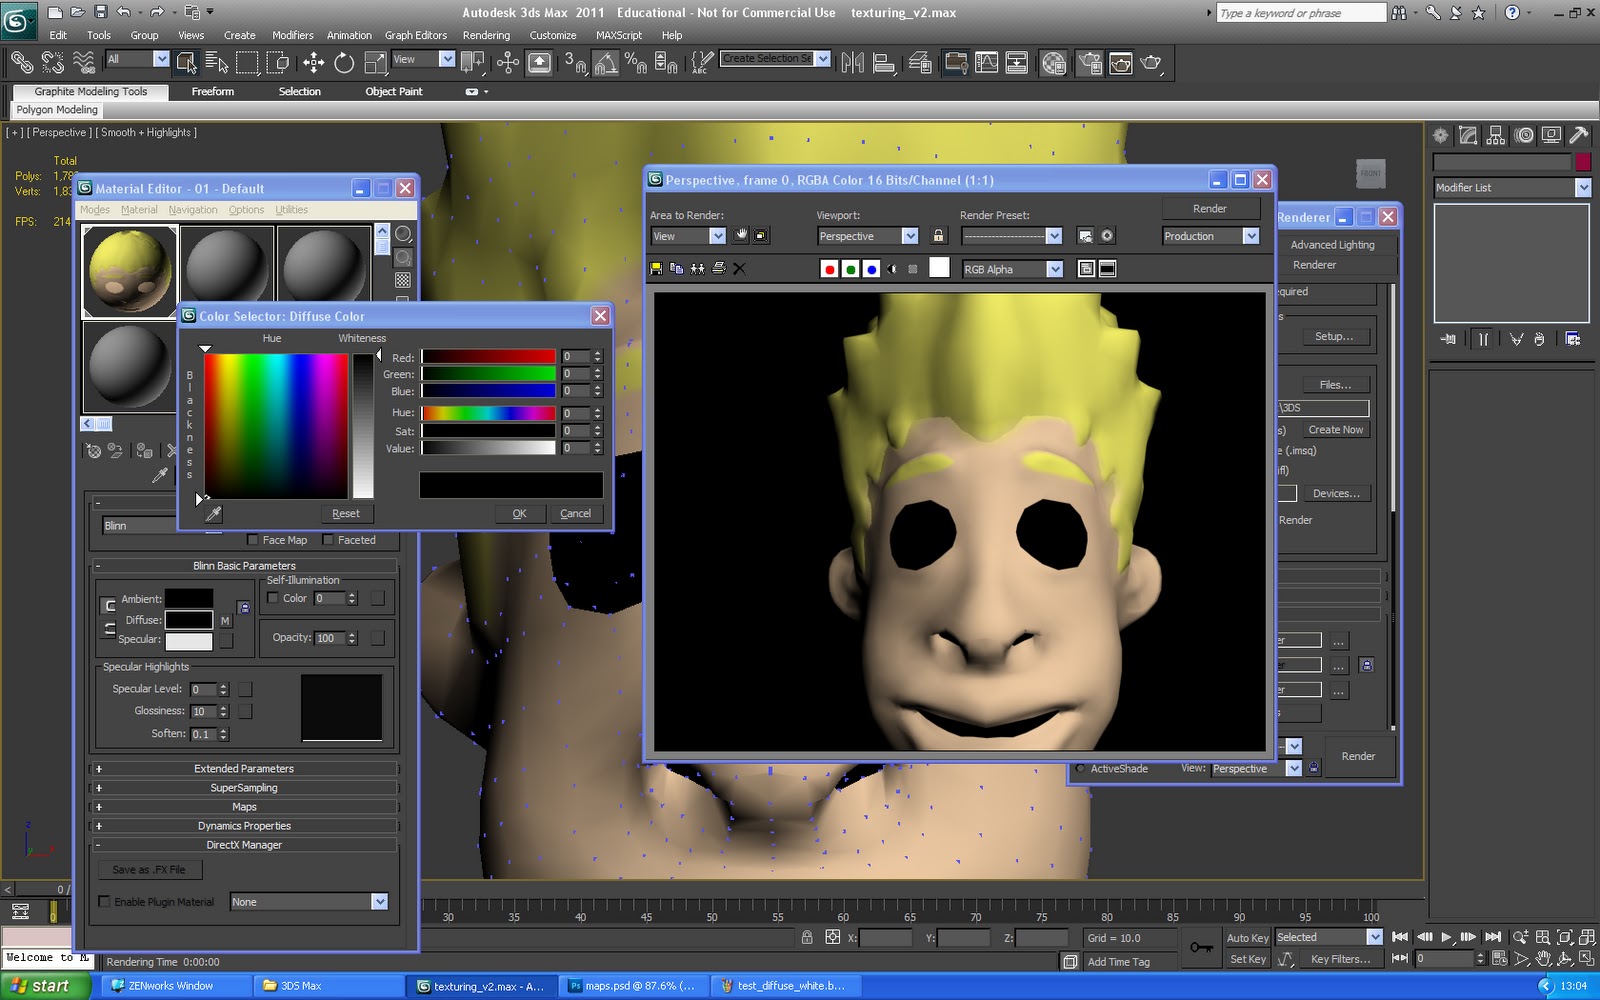
For creating the morph targets I initially did not realise that the morph target results would be very different whether the head was an edit poly or edit mesh. The initial head I used was an edit mesh which meant many of the head's facial features became distorted with morphing. Once the head was converted to an editable poly instead, these distortions were not as obvious or harsh.


As you can see from the image, the distortions are major with the aesthetics of the model being reduced heavily. Once I converted the head to an edit poly however, these disfigurements went away.

A problem I faced when duplicating the head, was that due to the skin modifier being copied as well, the head would move back to its original position. By copying the head and deleting the skin modifier, this allowed me to move the heads and edit them without them snapping back into position.


By using soft selection on my morph targets, this allowed me to select more vertices at different strengths to give a more even smoother look. The images below show the soft selection in action:


The image below shows my final morph targets, ready for animating:


Animating the Head

The animation for the head was done using keyframe animation. Using the autokey function, the morph targets are adjusted using the sliders, the autokey then saves this movement for playback. The images below show the rotation of an eye for a blink animation, and the mouth morphing to articulate a word:


I generally tried to keep all of the mouth animation within around a 30 frame timescale to make the movement look realistic, and help to synchronise with the audio clips.


Creating the Background

For the background to the character, we decided to have basic shapes like in a children's room. We decided on 3 possible designs: clouds, bubbles and leaves. Josh drew these in his sketchbook and scanned them into the computer, then I drew round the shapes in Illustrator, shaded the images in Photoshop and applied these as the background within 3DS Max.


Importing the Videos into Flash


I initially struggled with how to import the videos into Flash, as I was not sure which actionscript, command or method to use. I decided to research the 'loadmovie' and 'loadURL' options which appeared more complicated than I thought necessary. As we were exporting the product onto a CD-ROM, the videos would have to be either embedded into the timeline, or linked somehow to the path from the document. In the end, I decided that embedding would cause too big a file size for our computers to be capable of running smoothly.

I had previously tested a .f4v video to see how this worked with the .swf file. As this worked fine I decided to use Adobe Media Encoder to convert the .mov renders from 3DS Max. The images below show this process of encoding a video ready for importing.


The video is the imported into the document, resized to fit within the designated area, and then it is ready to be viewed when exported.


Converting JPEG's to PNG's

Our product uses PNG images with a transparent background so that the images blend nicely with the other layers. There are no harsh corners or white areas making the scene look cluttered. To do this I opened the images in Photoshop and created a 'layer from background'. Using the magic wand tool I deleted the blank background areas so that the image looks good.


Copying Frames and Replacing Images


Due to the amount of different frames with similar data, I was able to copy and 'paste in place' certain frames and images.

Once the frames had been placed and action scripted, then any other frames placed within the timeline would change the navigation of the buttons. This meant I had to either be careful where certain frames were, or plan it out before hand. Even though I went for the pre-planned option, changes in design meant that some frames were out of order. The image below shows the 2 identical frames except for the image and video render:


Capturing the Audio


We decided to have a voice over recording of each letter and word to be taught in our product. These were recorded using a Flash Mic that we hired from university. With the raw footage recorded, I transferred the data to my computer, and using Adobe Sound booth, cut the audio into separate tracks ready to be merged with the renders. The first image below shows the original sound wave for 'chicken', with the chosen section selected. The second shows an independent clip with decibel level increased.


Merging the 3D Scenes

Once each of the 3D scenes have been named and are waiting for animating, any changes to one scene must be done to each of them to ensure the videos look the same style. Each scene required the material to be made double-sided, so that the background could not be seen through the character's nose and mouth.


3-point lighting was used to capture the shadow of the characters movement on his body. This helped to identify the depth of movement between the arms and chest.


Merging the Renders with the Audio


Using Final Cut Pro, I merged the renders of the mid range and close range shots, with the audio files created using the flash mic. The sequences are then rendered out using Quicktime conversion. With the .H264 compression, and renders done at 30fps, these clips are converted to .f4v files, ready for importing into the Flash document.


Completing the Gantt Chart


For this project, we have kept a Gantt chart to remind us of when certain tasks need completing by - so that we do not fall behind with our deadlines.


The final, fully completed Gantt chart image shows all of our tasks are 100% completed except for the 'Motion Capture', which we decided against including in the product.


Individual Evaluation

Overall, I am very happy with my contribution towards this product. I feel that I have developed and used my skills well, to aid in creating a fun and interactive product which could potentially strengthen communicational and educational abilities within young children who are hard of hearing.

The main skills I have developed are within software areas I was already familiar with, but have explored areas which previously I had not. It was my second time using Z-Brush, which I thoroughly enjoyed, but feel that my modelling abilities will improve the more I use it. I am wanting to use this program within the industry in the future. The software I had the least experience with was Adobe Flash. I have used this a little at A-level, but felt it was suitable for creating the interactive navigation. I encountered many problems with Flash, such as how to import the video files and create fully functional navigation with a smaller file size as possible, which I am proud to say resolved the issues. Other issues which I overcome were the distorted morph targets within 3DS Max. If this had not been resolved, the character would have been hideous and certainly not appeal to small children.

I feel that I used my time productively throughout this project, and did not allow myself to fall behind with any deadlines. I was able to work on the Flash document whilst travelling to and from university using my laptop. This meant that I could put my commuting time to good use.

If I was to make this product again, I would like to spend more time focusing on the character modelling side as this would be my ideal career to move into. I would create more morph targets to show more expression on the face, which would help improve the overall look of the product. 


Group Evaluation

As a group, we feel that this product displays a broad range of skills, both technically and creatively. Working in this group has allowed us to experiment with various different ideas, technical processes and software. We feel that we have been a good group in the way that we have shared the workload equally. By dividing up the tasks and processes early on, both of us knew what was expected of us, and by what deadline. Occasionally, we would swap files using Facebook and Hotmail to help each other out. 

We are both under the impression that constant communication is essential to working well as a group, so that ideas can be shared, and each member of the group receives regular updates about the product and its current stages. Outside of university, we are good friends, which meant that our regular Facebook chat sessions could be utilised for our project.

We are both comfortable with the idea of working with each other again on future projects, should the opportunity arise, as we both have similar tastes and styles with regards to our animation, and also our social lives.


Product Evaluation


We are very pleased with the outcome of our product, and feel that we have designed and created something which could be very beneficial to young children with disadvantages in their communication skills. The product contains a broad range of good quality images, with little repetition, keeping the user enticed throughout the product.


The test feature allows users to challenge themselves and find out how much they have learnt from the product. Although the test features only one question for each category, the functionality shows that more questions and categories could be created for a larger product.


We are happy that we got a test feature which allows users to challenge themselves and find out how much they have learnt from the product. Although the test features only one question for each category, the functionality shows that more questions and categories could be created for a larger product.
We completed everything we set out to do and feel we met our aims and objectives successfully.
What would we do different:
If we were to carry on with this project there would be several changes and additions that we would make to improve the quality and fun within the product. In no particular order we would:
·         Create a customize section where by you can interchange colour scheme’s within the overall layout.  And also change and create viewport backgrounds. This makes the experience more personal to the user.
·         Create a female signing avatar so it is more gender friendly. Perhaps with a lot more time an area could be developed were you customize your own characters similarly to a Mii character on the Wii console.
·         I would rig the model better around the arms as there is some mesh distortion around the armpit regions during specific movements as mentioned within evaluation
·         Add more categories for the basics of sign language. Categories would include subjects such as colours, household items, questions, numbers and time.
·         Make the Test section larger by adding a “sentence build” section.
·         Add extra morph targets such as smile, sad and surprised  expressions
·         Animate the sign language that represents the introducing paragraph.
·         Spend more time sculpting the face to create more definition within the nose and ears bringing the character to life.


Thursday 17 March 2011

Computer Animation and Special Effects Level 6 Project (Masterpiece Project) Project Implementation/Evaluation

In order to progress with the group project, myself and Joshua Stammers, (http://joshuastammers.blogspot.co.uk), have assigned individual tasks for each of us to complete, which will form the interactive CD-ROM which was planned in the Project Research and Planning module.

My tasks have mainly included:

  • A complete, fully-rigged character head.
  • The interactive navigation for the CD-ROM.
As a group we created a Gantt chart to show the planned processes of the group within the allotted time before the deadline. Here is a screenshot showing the breakdown of each task, and the suggested completion time:


Currently, we are on target with this project, as we regularly check this chart to ensure we are completing the necessary targets in time.

Product Pitch


As part of this assignment, the proposed product was pitched in an attempt to persuade investors into the product. This went very well in our opinion, which has left both ourselves, and our investors eager to see the finished product.

Head Modelling


I have used the software, Z-Brush, to model my head ready for animation. Below is a sequence of images showing how I got from my initial base mesh, to my roughly completed finished head. I use the word 'roughly', as I will receive feedback on this model, and incorporate the opinions of others to hopefully develop this into an improved product. The first images show the initial sketches drawn by Joshua, which I used as reference for creating my head model:


Here is the sequence of stages showing my model through each sub-division level within Z-Brush. When creating the head, I tried to make it look cartoon-style, as specified in the brief, but also with good detail and proportions so that children could relate the characters features with their own.


After a group meeting, we decided that the eyes on this character were not what we were looking for as a presenter for young children. As the character was designed to be more of a cartoon-style figure, I have smoothed over the eyes in Z-brush, so that I can create independent eyes with rotating eye-lids within 3DS Max. I have appended spheres as a reference while I re-topologize the head.


 Here are two images showing the eyes with and without eyelids. I modelled the lower eyelids to add more detail to the ambient occlusion when the textures are baked onto the models.


Head Re-topology


After completing the modelling for the character's head, I brought the .OBJ file into 3DS Max to create a lower resolution of polygons for easier access to animation, and a smaller file size.


After the topology was finished, I used a symmetry modifier and welded both sides together.

UVW Unwrapping 

I then used a cylinder UVW unwrap to layout the mapping of the new topology, enabling me to texture the head.


These images show the UV co-ordinates before and after smoothing:


Texturing

Once I managed to get a good UV map, which had been relaxed to give a square checkerboard effect, I imported this into Photoshop to create a Diffuse, Normals and Ambient Occlusion to include in my materials for the modelled character head. In order: Diffuse, Ambient Occlusion, Normals, Merged. 


I then coloured over the diffuse to create the texture for our second selectable character:


These images show my testing for the diffuse map. I noticed that there were white rings around the insides of the eyes on this model, so I shifted it to black to see if this made a difference. When I saw that it did, I tried using the same RGB value which is used for the map within Photoshop, this did not work however as it did not have the ambient occlusion or normals map in this area.


I tested the bump map to see which levels would give me the best texturing. I have a screenshot showing the bump map at: 30, 100 and 150. I personally prefer the bump level at 100.


Here is a render showing both characters with their assigned textures:


Assigning Morph Targets


I have found a very useful tutorial explaining how to properly create a facial rig in 3DS Max, by assigning morph targets and using sliders and constraints to make animating the face much easier than keyframing each vector or polygon.
The tutorial can be found here: http://athey.comyr.com/tutdump/facerig/index.html


Work in Progress Presentation


We have a group presentation where we will show our clients the current status of the product and its functionality. The presentation will be in a formal and professional manor, to hopefully satisfy our investors.
To show our current progress, I have uploaded a screenshot showing the Gantt Chart for our project:


CD-ROM Interactive Navigation


For the navigation, I am using Adobe Flash CS5. Before this project I had some prior experience using Macromedia Flash MX, which is now a rather primitive version of the software. The main change within the software for me, is the incorporation of Actionscript 3.0, which is a lot more complicated to use than Actionscript 1.0 or 2.0. I have looked at tutorials and found as much information as I can to aid me in creating a professional looking, fully functional CD-ROM. The aim is to produce a '.swf' file which can be burnt to a CD-ROM, so that it can be used on other computers. Depending on legality, we would also include a copy of the Flash Player Installer from the Flash website, so that anyone would could install, and run our software.

Below is example screenshots showing the layout of my first navigation design. As I am not designing the colours, images, backgrounds etc, I have just created this prototype to test links and buttons:


After a feedback session with Darren Wall, we have decided that the colour scheme may not be ideal for our target audience. Also, the fact I have used 2 different fonts looks unprofessional. These are useful changes which can be made for the next prototype.

Saving to a Disc for Windows and Macintosh Users


I was wondering about how to burn the finished product to a disc that can be used by both Windows and Mac users. I have looked at several different websites with scripts to 'Autorun' the software - but want to attempt this as a practice prototype first.

This website looks useful:
http://www.ehow.com/how_5883109_save-flash-files-disk.html

This website has the autorun feature and looks very simple to do:
http://www.amarasoftware.com/tutorials/auto-launch.html


CD-ROM Navigation: Version 2


After speaking with the clients for our product, it was decided that their were a few factors which should be changed to create a more professional and functional product.
The colour scheme originally chosen did not provide the style we were hoping for our target audience. The colours seem a bit too bold and overpowering, so we have decided to use less colours with varying shades. This should make the product look much more aesthetically pleasing, and pay greater focus to the main aspect of the product - the informative videos. Another point was the use of different fonts in the prototype, which made it look rather messy. The use of one style of font throughout is definitely better in keeping with the selected theme.

These images show some of the navigation pages with the working links and an embedded video showing the product is functional and just requires the finished videos and images.


The navigation has been divided into 'Learn' and 'Test'. Learn has the educational videos under each category and has the character wearing a graduation hat. Test gives the user 3 possible answers and a video is shown. The user must successfully identify the correct answer.


Importing / Embedding Video within Flash

I was originally unsure about how to import or embed a video into flash, which was crucial for creating the interactive flash document successfully. I discovered online that the best way to do this was to either have the video within the document timeline which would play in time with the .swf file. I have used actionscripting for the navigation which causes the timeline to stop at each frame. For this reason, I have converted the .mov file used to a .f4v file using Adobe Media Encoder, which can then be dropped onto the flash document which sufficient playback.


Product Evaluation
In its current state, the product is showing areas of completion and the areas that are not quite finished can be easily updated once the material has been rendered out. 
The main task still left to complete is the animating of the head and body for each word/letter we have on the CD-ROM. As the body is fully rigged and skinned, and the head has been morphed and constrained, the animation can be done easily, leaving us more time to spend on human realistic motion. We feel that this is an important area to research thoroughly as accuracy will only make the product more educational and useful for our target audience. Any additional material can be used in conjunction with the video footage captured in our initial research and planning module.

Group Evaluation
From looking at the Gantt chart showing our group progress on this current project, you can see that we are on track with our project and are confident that we will have a professional product as requested by our clients.
As a group we have maintained constant, productive communication to make sure that both members of the group are keeping up-to-date with their tasks. Below are screen shots showing messages sent on Facebook between the group. This function was very helpful for sending files to each other.